To share slides during a livestream, use the platform’s built-in presentation feature if it supports the deck you need; otherwise share the presentation tab or window. For a camera-plus-slides layout with more control, compose both in OBS. Before going live, check that the audience sees the right slide, your advancement controls work, and any video or audio in the deck reaches the stream.
Choose the sharing method that fits your deck
| Method | Best when | Important limitation |
|---|---|---|
| Built-in slides in the live studio | You want a straightforward workflow, especially on one monitor. | StreamYard’s built-in presentations do not support animations, audio, or video in the deck. |
| Share a browser tab or application window | You need the deck to play as it does in Google Slides or PowerPoint, including supported animation, video, or audio. | You must select the correct tab or window and add the share to the live stage. |
| Capture sources in OBS | You want to arrange slides, camera, and other sources in a custom scene. | Capture-source names and availability depend on your operating system and version. |
These platform instructions are documented by StreamYard and OBS; interfaces can change. Check the current help pages for your software and operating system before a broadcast.
Use StreamYard’s built-in presentation feature
This option keeps the deck inside the studio rather than requiring you to capture another app. StreamYard documents Google Slides import and uploads of .pptx, .ppt, .pps, .ppsx, .odp, and .pdf files.
- Open the StreamYard studio and select Present → Slides.
- Choose Google Slides and sign in to grant access, or upload a supported local file.
- After the presentation is processed, add it to the stage.
- Use the on-screen presentation controls to move through the deck, and confirm the audience view before starting the stream.
Uploaded media presentations do not persist after leaving the studio, according to StreamYard’s instructions, so you may need to upload one again in a later studio session. If your slides rely on animation, embedded audio, or video, use screen sharing instead.
Free tools Windows power users keep installed
One-click scans. No signup required.
#1 Best Overall

- 【PLUG & PLAY】This presentation clicker supports page up/down, hyperlink navigation, volume control, power on/off, and full screen/black screen switching. No software or driver is required, just plug the USB receiver into your computer's USB port and you're ready to start the show (Requires one AAA battery, not included)
- 【BRIGHT RED POINTER LIGHT】This powerpoint clicker emits a bright red light that helps you clearly mark key parts of each slide so your audience can easily follow your main points. It remains clearly visible even in large conference rooms or lecture halls
- 【328FT LONG WIRELESS RANGE】This clicker for PowerPoint presentations delivers a control distance of up to 328 ft, allowing you to roam the entire hall and interact directly with your audience. Step away from the limits of a stationary podium to deliver a more dynamic presentation
- 【BROAD COMPATIBILITY】This wireless presenter remote works smoothly across different systems and software, compatible with Mac OS and Windows laptops. It supports software such as PowerPoint, Keynote, Google Slides, Excel, ACDSee, and Prezi
- 【PORTABLE SLIDE CLICKER】This presentation pointer includes a convenient clip that attaches to a notebook or pocket for easy carrying. It is a helpful tool for meetings, classrooms, training sessions, and presentations, and it is also suitable for sharing with colleagues and friends
Share Google Slides from a Chrome tab
- Open the deck in Google Slides, then open or return to the StreamYard studio.
- Select Present → Share Screen.
- Choose the Chrome tab containing the deck. Enable the tab-audio option if the presentation’s audio needs to reach viewers; StreamYard’s screen-share guidance says audio sharing is supported for Chrome tabs.
- Start the slideshow in Google Slides. If the shared tab is not already on stage, add it to the stage.
- Advance using the spacebar, arrow keys, or a mouse click. Watch the audience output as you change slides.
A second monitor can make this easier: keep the live studio and comments or controls on one display while presenting from the other. With one monitor, rehearse switching between the studio and slideshow so you do not accidentally show controls or the wrong tab.
Share a PowerPoint presentation
- Open the deck in PowerPoint and start Slide Show from the beginning or from the current slide.
- If you have multiple monitors, choose the display that should show the slideshow. StreamYard’s instructions say to disable Use Presenter View if needed so the slideshow appears on only one screen.
- In the StreamYard studio, choose Present → Share Screen, then select the PowerPoint Slide Show window or the intended display.
- Add the share to the stage if necessary. Return to the slideshow window to advance slides, and verify the result in the live output.
Sharing the slideshow window helps keep speaker notes and PowerPoint controls off the audience view. If you share an entire display instead, check carefully which screen is being captured.
Rank #2

- Presenter mode, built-in Class 2 red laser pointer for presentations, intuitive touch-keys for easy slideshow control. AAA batteries required (best with Polaroid AAA batteries)
- Bright red laser light - Easy to see against most backgrounds, works as a pointer clicker for presentation and clicker for powerpoint presentations
- Up to 50-foot wireless range for freedom to move around the room
- There's no software to install. Just plug the receiver into a USB port to begin. This power point clicker wireless solution makes presentations easy, and you can store the receiver in the presentation remote after use.
- 2.4GHz RF wireless technology, built-in docking bay stores receiver for easy pack up and portability; works well as a presenter clicker wireless or computer clicker for presentations.
Show slides and your camera together with OBS
OBS lets you compose a scene from capture sources, a webcam, and other elements. A display-capture source captures a whole monitor; a window-capture source captures one application window where supported. Exact source names and available capture methods vary by operating system and OBS version.
- Open OBS and create or select a scene for the presentation.
- Add the appropriate capture source: choose a display capture to show a whole monitor or a window capture to show the presentation app where that source is available.
- Add your webcam source. Arrange and resize the slide and camera sources in the preview so the slides remain readable and the camera does not cover important content.
- Configure audio sources if the presentation or microphone requires sound. Check OBS’s audio meters and confirm the intended audio is included.
- Set up the stream destination and confirm the selected scene is active before going live. OBS’s Quick Start Guide recommends a short test before a first stream: “We strongly encourage running a test for a few minutes to make sure that there are no issues, rather than just jumping in to your first stream or recording.”
OBS documentation identifies macOS Screen Capture for macOS 13 or newer; the older Display Capture source is available on Windows and macOS through 12.6. Linux has other capture paths. Because capture behavior is OS- and version-specific, consult the current OBS documentation for your setup rather than assuming one source name applies everywhere.
PC Slower Than It Used to Be?
A free scan shows the junk files, broken settings and background clutter dragging Windows down - then fixes them in one click.Free scan · Windows 10 & 11Outdated Drivers Are Slowing You Down
One free scan finds every outdated or missing driver and matches the right update for your exact hardware.Free scan · exact hardware matchRank #3

- 【PLUG & PLAY】 The clicker pointer for presentations is easy to use, just plug the usb receiver and it is ready to go, no need to download any software. (The USB fits into the bottom of the clicker. )
- 【PRESENTATION CLICKER FEATURE】Presentation remote supports various functions:Page Forward/ Backward, Volume Control, Hyperlink, Switch Windows, Full/Black Screen.It is an efficient presentation tool for daily presentations
- 【BRIGHT RED POINTER & 100FT LONG WIRELESS RANGE】 Powerpoint presentation clicker with bright red light that is easy to see against most backgrounds ((Not Recommended for LCD/LED/TV Screens);Wireless range of powerpoint presenter up to 100 foot, free to move around even in a large room
- 【WITH SUPERIOR DETAILS】 ①One-piece magnetic usb storage, not easy to lose the usb ②Soft and rubber buttons ③Compact design & Space save and comfortable grip ④ Bumped-buttons design for easy slideshow control.⑤Operated by 1xAAA battery(Not included), with energy-saving auto-sleep function, one battery can be used for weeks
Check the final livestream output, not just your presenter view
- Confirm the audience sees the intended slide and not speaker notes, app controls, or the wrong monitor.
- Advance several slides and check that the changes appear in the stream.
- Check that your camera is visible, framed well, and not obscuring text.
- If the deck includes audio or video, verify that it plays in the output and that audio sharing is enabled where required.
- Check the destination’s actual output. Zoom says its presenter layouts can place shared content and presenter video together in meetings or webinars, but those layouts are not supported in cloud recordings or live streaming.
Common problems and fixes
| Problem | Likely cause | What to check |
|---|---|---|
| Viewers see a blank screen or the wrong content | The wrong tab, window, or monitor was shared, or the share was not added to the stage. | Stop sharing, select the intended source, add it to the stage, and confirm the audience output before continuing. |
| Slides advance on your screen but not in the stream | The presentation is not the active shared source, or controls are being used in a different window. | Return to the shared slideshow and advance there; check the live output after a test slide. |
| Animation, embedded video, or audio is missing | The built-in presentation route does not support these deck features. | Share the presentation app or its Chrome tab instead. For Chrome tab audio, enable the audio-sharing option. |
| PowerPoint notes or controls appear to viewers | The presenter view or the wrong display is being captured. | Choose the Slide Show window or correct monitor; disable Use Presenter View if needed. |
| Camera and slides do not fit together | The layout has not been composed or checked at audience size. | In OBS, resize and position the camera and capture sources in the scene; keep text unobstructed and readable. |
| Zoom’s recording or stream lacks the presenter layout | That layout is not supported in Zoom cloud recordings or live streaming. | Check the livestream destination’s output and choose a layout or capture workflow it supports. |
Or let it run in the cloud
If your goal is to keep uploaded videos looping as a YouTube livestream rather than present a live slide deck, StreamNeo runs the stream in the cloud. Upload your recording or build a playlist, add your YouTube stream key once, and go live. It does not require a computer or home connection to stay on, streams the uploaded file as made up to 4K 60fps for one flat price per slot, and automatically recovers if YouTube drops the stream. The first day is free with no card, one free day per account; the Monthly price is $9.99 per month. StreamNeo streams to YouTube only and plays uploaded videos; it is not a live camera service. Start your free day with StreamNeo.
Quick Recap
Best Value

- 【USB-A & USB-C Built-in Receiver – One for All Devices】No more dongles or adapter hunting. This presentation clicker features a receiver with both USB-A and USB-C connectors built right in. Whether you have a new Mac with Type C ports or an old PC with USB A, it works instantly – just plug and present. Perfect for presentation clicker usb c users.
- 【Plug & Play – No Software, No Setup】Simply plug the 2.4GHz receiver into your computer’s USB port and you're ready. This clicker for powerpoint presentations requires no driver or software installation. It works seamlessly with Mac OS, Windows, Linux, and supports PowerPoint, Keynote, Google Slides, and Prezi. Ideal as a computer clicker for presentations.
- 【Bright Red Light Pointer + Long Wireless Range】The bright red light pointer helps you highlight key content on any slide – visible even in large conference halls (pointer distance up to 100M). With a wireless control range of up to 100ft (30M) , this wireless presenter lets you walk freely and interact with your audience. A true slide advancer for dynamic talks.
- 【Full Function Control & Ergonomic Comfort】This powerpoint clicker gives you complete command: Page Up/Down, Full Screen / Black Screen, Volume Increase/Decrease, and Switch Windows. The ergonomic body with soft touch oil coating and contoured keys fits naturally in your hand – your show stays smooth even in a dark room. Also works as a pointer clicker for presentation.
- 【Low Power Consumption & Magnetic Receiver Storage】 Powered by 2x AAA batteries (not included), this presenter clicker wireless features intelligent low power consumption with auto sleep technology – 30+ days standby time on a single set of batteries. A magnetic slot at the bottom securely holds the receiver – never lose your USB A & USB C receiver again. Ideal for wireless presentation clicker users who value energy efficiency.
Rank #4
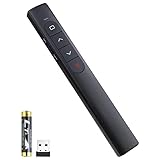
- [ PLUG & PLAY MULTIFUNCTIONAL] Presentation clicker combines the functions of hyperlink, switch windows, page up, page down, full screen, black screen. Plug & Play, no need to install software (For Mac, may requires simple set-up)
- [100 FT Long Control Range] UBUYONE Wireless Presenter remote is equipped with top-grade microchip to ensure a real 100M/328FT long control distance, Red light range: 200M/656FT. Power point presentation clickers produces a bright red light that's easy to see against most background.
- [High compatibility] Demonstration remote control can support systems: Windows/XP/Vista/7/8/10, Mac OS, Linux, Android. The software supported by the wireless presentation clicker are: PowerPoint/Keynote/Prezi/Word/Excle/ACD See/iWork.
- [BRIGHT RED LIGHT] Wireless clicker for PowerPoint presentations, easy to see against most backgrounds, can be used to highlight key parts of a presentation
- [ Perfect Tool and Gift ] The presentation clicker will be the perfect tool for your presentation, teaching and meeting, and it will be the best gift for your friends or family. Power by 1* AAA battery.
Product prices and availability are accurate as of the date/time indicated and are subject to change. Any price and availability information displayed on Amazon at the time of purchase will apply.