
Do these 3 things before closing this tab:
1Scan for outdated or missing drivers - takes under a minute2Clear out junk files and repair common Windows errors3Fix the driver behind crashes, sound loss and screen glitchesSome links on this page are affiliate links: if you buy through them we may earn a commission, at no extra cost to you.
To run a YouTube Live playlist on a Raspberry Pi, use Raspberry Pi OS with its graphical desktop and Chromium, then configure Chromium to open the playlist’s normal YouTube page in kiosk mode at startup. Turn on autoplay in that Pi browser session and test the playlist before leaving it unattended. Kiosk mode makes playback full-screen; it does not guarantee that every live playlist will advance indefinitely without prompts or recovery.
What you need
- A Raspberry Pi 3 or newer with at least 1 GB of RAM—the baseline Raspberry Pi gives for a graphical browser kiosk, not a guarantee of smooth playback at every stream resolution.
- A microSD card and a suitable power supply.
- A monitor or TV, plus the display cable that fits your Pi. Raspberry Pi 4 and later use micro-HDMI; for a standard HDMI display, use a micro-HDMI-to-HDMI cable or adapter.
- A network connection and the YouTube playlist URL.
Raspberry Pi’s kiosk-mode tutorial lists the basic hardware and recommends a Pi 3 or newer with at least 1 GB of RAM. If you plan to manage the Pi without a keyboard and mouse, configure network access and SSH during OS imaging. Choose a board and cable that fit your display and local availability; the cited guidance does not benchmark YouTube live-playlist performance by Pi model.
Set up Chromium to open the playlist at startup
- Install Raspberry Pi OS (64-bit) and complete initial setup. Use the graphical desktop, since this method relies on Chromium displaying the player.
- Open the playlist’s regular YouTube page in Chromium. Copy the playlist URL from YouTube and test that it loads and plays in the Pi’s browser before configuring startup.
- Configure the desktop autostart entry to launch Chromium in kiosk mode. Follow Raspberry Pi’s official kiosk instructions, using its Chromium `–kiosk` launch option and replacing the example destination with your playlist’s normal YouTube page. Kiosk mode removes the usual browser interface for a full-screen display.
- Restart the Pi and check the result. Confirm Chromium opens the intended playlist and that the monitor is showing the correct input. If the Pi is operated headlessly, arrange a way to reconnect or manage it over the network.
Choose the playlist page or an embedded player
Use the normal playlist page for the simplest setup
Opening the regular playlist page is the straightforward choice for a kiosk: configure Chromium to visit that page and use YouTube’s player controls. Check for prompts or other interruptions during your test, since kiosk mode does not make them disappear.
Free tools Windows power users keep installed
One-click scans. No signup required.
Use an embedded player only inside a webpage
YouTube supports embedding videos and playlists in a webpage, and its embed instructions document `autoplay=1` for embedded-player code. If you need a custom presentation, put the embed in a real webpage and configure Chromium to open that page. Avoid making a bare `youtube.com/embed/…` URL the browser’s destination: YouTube says an embedded player opened directly in the address bar may lack an HTTP Referer and can show error 153.
Popular on Amazon
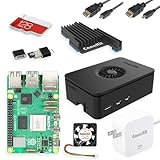
- Includes Raspberry Pi 5 with 2.4Ghz 64-bit quad-core CPU (8GB RAM)
- Includes 128GB Micro SD Card pre-loaded with 64-bit Raspberry Pi OS, USB MicroSD Card Reader
- CanaKit Turbine Black Case for the Raspberry Pi 5
- CanaKit Low Noise Bearing System Fan
- Mega Heat Sink - Black Anodized
Enable and verify autoplay
Use the YouTube player’s autoplay control in the Pi’s Chromium session. YouTube notes that autoplay settings can vary between devices, so a setting enabled on a phone or television is not proof it is enabled on the Pi. Test the actual playlist in the kiosk browser, including what happens when one live item ends, pauses, or errors. YouTube’s autoplay help describes playback controls and inactivity limits in some network situations; it does not certify unattended, uninterrupted playback on a Raspberry Pi.
Match the display connection to the Pi
For Pi 4 and later, connect a standard HDMI monitor with a micro-HDMI-to-HDMI cable or adapter, and check that you have selected the matching Pi output and monitor input. Raspberry Pi documentation says Pi 4 and later support output up to 4K, with refresh rates depending on the model. That display-output capability does not establish that every YouTube codec or resolution will play smoothly. For display setup, see Raspberry Pi’s getting-started documentation.
Also popular on Amazon

- CanaKit Raspberry Pi 5 Essentials Starter Kit
Keep unattended playback recoverable
Autoplay and kiosk mode reduce routine interaction, but the cited YouTube and Raspberry Pi guidance does not promise that a live playlist will advance forever without intervention. Before relying on the setup, run it for a representative period and check for player pauses, ended or errored streams, network interruptions, and YouTube prompts. Keep a practical way to reach the Pi—physically or through SSH if configured—so you can reload Chromium or restart the system if playback stops.
Or let it run in the cloud
If you want a YouTube channel to keep streaming uploaded videos without leaving a Pi or computer running, StreamNeo runs the stream from the cloud. Upload a recording or build a playlist, add your YouTube stream key, and go live. It plays uploaded videos rather than broadcasting from a camera, and streams to YouTube only.
Quick Recap
Also popular on Amazon

- 【What you Get】You will get 1*Pi 5 8GB Single Board,1*RasTech Case,1*Active Cooler,1*Screwdriver,1*Installation instructions,12-month free warranty, lifetime service, 24-hour prompt and friendly response.
- 【More Connectors】There are two USB 3.0 ports(5Gbps simultaneously) and two USB 2.0 ports, which triple total bandwidth ,support any combination of up to two cameras or displays. Peak SD card performance is doubled through support for the SDR104 high-speed mode. It provides a smooth desktop experience for you. Offer Gigabit Ethernet and a PCIe interface, along with dual-band Wi-Fi and Bluetooth 5.0/BLE wireless capability. The RasTech Pi 5 Kit use the new 27W 5.1V 5A USB-C power connector.
- 【 Support Dual 4Kp60 Display 】Each of the two microHDMI sockets can control a 4K display at 60 Hertz, now support HDR, offering super HD video for media streaming projects. RPi 5 is the first RPi model that comes with a PCI Express port (PCIe 2.0 x1 with 500 MB/s) to attach SSDs (requires separate M.2 HAT).
- 【 Excellent Chips And Applications】Pi 5 is a full-size Pi computer using silicon built in-house at Pi. The RP1 “southbridge” provides the bulk of the I/O capabilities for Pi 5. Pi 5 is more friendly and convenient in the development of Internet of Things, Web development, machine identification, automatic control and other electronic equipment applications and network.
- 【 Faster CPU, Better GPU 】 Pi 5 features a Broadcom BCM2712 64-bit quad-core Arm Cortex-A76 processor running at 2.4GHz, it delivers a 2–3× increase in CPU performance relative to RaspberryPi 4. The 800MHz VideoCore VII GPU is compatible to OpenGL ES 3.1 and Vulkan 1.2, substantial uplift in graphics performance. Pi 5 Offers lightning-fast CPU speed, a PCI Express interface, a Real Time Clock (RTC) and a power button and runs significantly cooler than Pi 4.
Also popular on Amazon

- All-in-One Complete Kit: This SANOOV RPi 5 bundle comes with Raspberry Pi 5 4GB RAM single board, active cooler, durable ABS case and screwdriver. No extra parts needed, ready to use right out of the box for beginners and hobbyists
- Powerful Single Board Computer: Equipped with 4GB RAM and high-performance processor, delivers fast running speed for 4K playback, AI projects, programming and daily computing tasks. SANOOV for raspberry pi 5 4GB is equipped with broadcom 64 quad-core Arm Cortex A76 processor with gigabit ethernet and upgraded with IEEE 802.11ac Wi-Fi, Bluetooth 5.0 dual-band 2.4Ghz and 5Ghz and Power Over Ethernet (POE). Upgrading delivers 2-3 x speed vs Pi 4, redefining the experience
- Efficient Active Cooler: Effectively lowers operating temperature and prevents performance throttling. Runs quietly even under long-time heavy load, ensures stable operation all day long. SANOOV RPi 5 4GB kit offer an active cooler, which combines an aluminium heatsink with a high-performance PWM fan. Active cooler is fully compatible with the Pi OS, which can effectively reduce the temperature of RPi5 and ensure its good performance during long-term high load operation
- Sturdy ABS Protective Case: Well-fitted for Raspberry Pi 5 board, can be secured with 4 screws to effectively protect the Pi 5 motherboard from damage, reserves full access to all ports and buttons. SANOOV uses ABS material to produce the case, which has a softer texture and feel. Meanwhile, SANOOV case adopts a layered design for easy disassembly and installation. (Tip: The Case cannot install M.2 HAT Add on Board and Solid State Drive!)
- Wide Application & Full Compatibility: Seamlessly compatible with official OS and mainstream peripheral accessories for Raspberry Pi 5. Whether you are a beginner, student, electronics hobbyist or professional developer, this all-in-one kit meets your diverse needs. It excels in IoT projects, robotics design, retro gaming devices, home media servers and other DIY creations. Backed by a large global community, you can easily find guides, technical support and shared projects online
- Nothing has to stay on at home: StreamNeo keeps the stream running from the cloud.
- Any quality up to 4K 60fps as uploaded, at one flat price per slot; there are no quality tiers or re-encoding.
- Automatic recovery if YouTube drops the stream.
- The first day is free with no card, one free day per account. Monthly pricing is $9.99 per month.
Start your free StreamNeo day.






Say something about this film